Appearance
Question Editors
Questions are the practice activities students complete inside a lesson. Use them when students should choose an answer, complete a sentence, type from memory, arrange words, or record their voice.
This guide explains the parts that all question editors share. Each question type also has its own page with screenshots and setup steps.
Creating a New Question
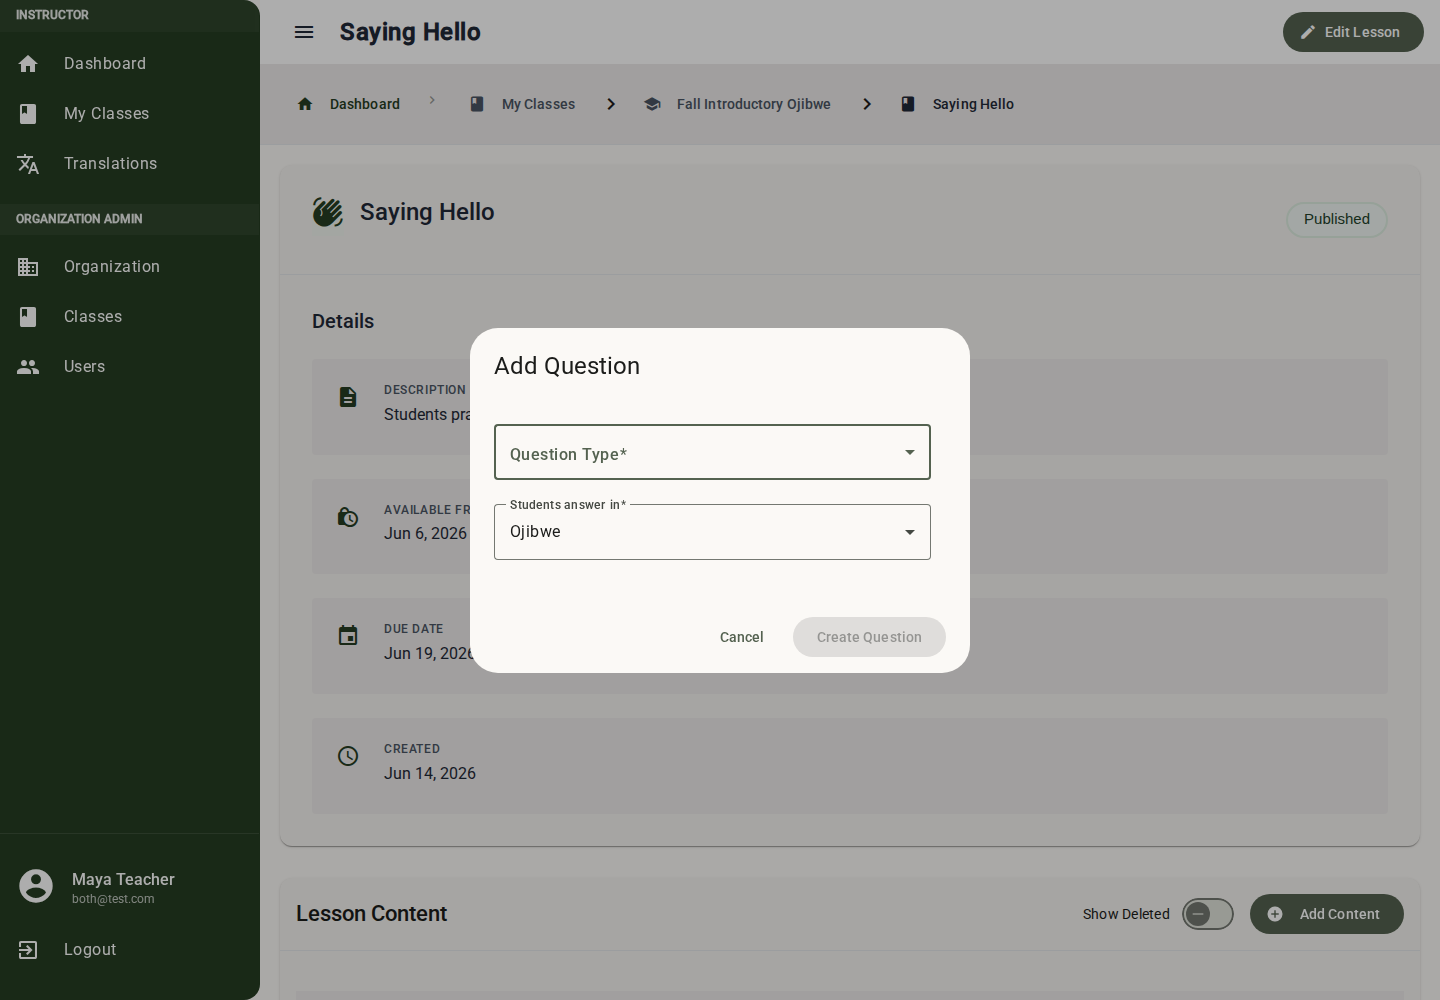
- Navigate to a Lesson Detail page (Class > Unit > Lesson).
- Scroll to the Content section.
- Click "Add Content" and select Question.
- A dialog appears with the question setup fields.
Question Type
Select one of the five question types:
| Type | Best for | Graded automatically? |
|---|---|---|
| Multiple Choice | Vocabulary recognition (pick the correct option) | Yes |
| Fill in the Blanks | Sentence completion (drag words into blanks) | Yes |
| Build Sentence | Word ordering (arrange words into a sentence) | Yes |
| Type Answer | Written recall (type the correct word/phrase) | Yes |
| Record Audio | Pronunciation (record their voice) | No |
Students Answer In
Use Students answer in to choose the language students should use for the answer. This is not a separate "translation question" setting anymore. The same question types can be used for translation practice, comprehension checks, cultural-context questions, and pronunciation work.
Common patterns:
| Pattern | Students answer in |
|---|---|
| Translate from the primary language into the translation language | Translation language |
| Translate from the translation language back into the primary language | Primary language |
| Ask a comprehension or cultural-context question | The language you want students to answer in |
| Ask for pronunciation practice | The language students should speak |
After Clicking "Create"
The system creates an empty question and navigates you to the Question Editor page. From here, you build the question content.
Shared Rich Text Prompt Editor
Every question type has a Question section for the text students read before answering. The rich text editor works like a small document editor: type normally, format the text when needed, and link important words to translations when students should be able to tap them for help.
The same rich text editor is also used by optional Instructions sections and by Information Entries. Learn it once and you can use it anywhere lesson content accepts formatted text.
What You Can Add
Use the toolbar to format prompt text:
| Tool | Use it for |
|---|---|
| Bold and italic | Emphasis inside instructions or prompts |
| Heading | Short section titles inside longer prompts |
| Bullet and numbered lists | Vocabulary lists or ordered instructions |
| Quote | Sample speech, cultural notes, or examples |
| Link | External reference material, when appropriate |
| Image | Insert an image directly into the prompt |
| Translation | Link selected text to a translation entry |
| Undo and redo | Revert recent editor changes |
Question editors can also show an optional Instructions section above the question. Instructions use the same rich text editor and are useful when every question of that type needs extra student-facing guidance.
Basic Editing
Click into the editor and type normally. Use the toolbar for formatting after selecting text, or turn a format on before typing.
Common editing behavior:
- Bold and Italic apply to selected text or the next text you type.
- Heading turns the current paragraph into a heading.
- Bullet list, Numbered list, and Quote apply to the current block.
- Link prompts for a URL. Leaving the URL blank removes the link from the selected text.
- Image uploads the selected image file and inserts it at the cursor.
- Undo and Redo apply to recent rich text edits inside the editor.
The live preview beside the editor renders the same text in the student-facing style. Use the preview to check spacing, images, linked translation highlights, and pronunciation/romanization display before saving.
Translatable Text
Most prompt, instruction, answer-option, sentence, and word-bank sections include a Translatable toggle.
| Toggle state | Behavior |
|---|---|
| On | Students can tap linked text to see translations. Text in that section must have linked translations or No translation needed (N/A) markers where required. |
| Off | The section is plain text. Students see it as written, and translation validation is not required for that section. |
Translation-practice questions usually use translatable content. Comprehension questions and custom instructions may use plain text when the content is explanatory rather than translation practice.
Adding Translated Words in Rich Text
There are two ways to add translated words to rich text: the toolbar flow and the inline suggestion flow.
Toolbar Flow
Use this when the word or phrase is already written in the prompt.
- Select the word or phrase in the editor.
- Select the Translation toolbar button.
- Search by source text, translated text, pronunciation, or romanization.
- Choose the translation that matches the text you selected.
- If the word is not in the dictionary yet, add it from the translation dialog.
When you select a translation, the editor replaces the selection with the display-side text from that translation and links it to the translation record. If there is no selected text, the editor inserts the translated word at the cursor.
Inline Suggestion Flow
Use this when you are typing new content.
- Type a word in a translatable editor.
- Pause briefly after the word. A suggestion menu appears when matching translations exist.
- Use the mouse, Arrow Up/Down, Enter, or Tab to choose a suggestion.
- The editor replaces the typed word with the linked translation text and adds a trailing space when needed.
The suggestion search checks both language directions for the editor's configured languages. This means typing either side of a known translation can still find the right entry.
If no exact match exists, the suggestion menu offers Add translation for "...". Selecting it opens the translation dialog in create mode with the typed word prefilled, then inserts the newly created translation back into the rich text.
Choosing Translation Direction
The editor has two language IDs for translatable text:
| Setting | Meaning |
|---|---|
| Display language | The language shown directly in the rich text. |
| Translation language | The language students see when they tap or hover the linked word. |
For example, if the display language is English and the translation language is Ojibwe, the prompt may show thank you while the linked translation exposes miigwech. If the direction is reversed, the prompt can show miigwech while the help text exposes thank you.
The translation dialog can orient an existing translation either way when both languages match the editor's language pair.
How Linked Translations Appear
Linked translation text is highlighted in previews and in student-facing content. If a language supports pronunciation or romanization, that representation appears with the translation where the UI has room to show it.
In the editor, linked words have a translation highlight. Hover over a linked word to see the linked translation text. In the student preview, linked words render as tappable translation marks so students can get help without leaving the lesson.
Removing or Replacing a Linked Translation
To remove a rich text translation link:
- Click inside the linked word.
- Select the Remove Translation toolbar button.
- The visible text remains, but it is no longer linked to a translation record.
To replace a link, select the linked word and use the Translation toolbar button again. The dialog opens with the current translation selected, and choosing another translation updates the mark.
When to Use No Translation Needed (N/A)
Use No translation needed (N/A) for text that should remain visible but should not require a dictionary translation, such as:
- Names.
- Punctuation.
- Classroom labels.
- Loanwords or words you intentionally do not want translated.
- Short connective words in an otherwise translatable sentence.
N/A is most common in compact word-bank and answer-option controls. In rich text, prefer leaving explanatory sections with Translatable off when most of the paragraph is not meant to be tappable translation practice.
Answer and Word Bank Translation Controls
Answer choices and word-bank items still use compact translation rows instead of the full rich text editor.
- Use Browse Translations to select from the dictionary.
- Start typing in a word-bank input to see translation suggestions.
- Clear a linked translation with the close action when you need to replace it.
- Mark punctuation, names, or non-translatable words as N/A when the editor offers that option.
Translation Sync Across the Editor
If you update a translation for repeated text, the editor may ask whether to update matching instances elsewhere in the question. Use Update All when the repeated text should point to the same translation throughout the prompt, options, sentence, and word bank.
Images in Prompts and Instructions
Every question type can include images inside rich text prompt or instruction sections.
Adding an Image:
- Click in the prompt or instruction editor where the image should appear.
- Select the Insert Image toolbar button.
- Choose an image file.
- The image is uploaded and inserted into the editor content.
Managing Images:
- Remove an inserted image from the rich text content when it is no longer needed.
- Upload a replacement image if the visual context changes.
Use Cases:
- Show a picture of an animal for "What is this in Ojibwe?"
- Display a scene for fill-in-the-blanks context
- Provide cultural context for a word or phrase
Editor Type Guides
Each question type has its own focused guide:
| Guide | Use it when students should... |
|---|---|
| Multiple Choice | Pick one correct answer from a fixed set of options. |
| Fill in the Blanks | Complete a sentence by dragging missing words into blanks. |
| Build Sentence | Arrange a word bank into the correct sentence order. |
| Type Answer | Type a word or short phrase from memory. |
| Record Audio | Record spoken audio for pronunciation practice. |
Use the type-specific pages for screenshots, step-by-step setup, what must be complete before publishing, and best practices for each editor.
The Audio Recording Control
The audio recorder appears in several places: Record Audio questions, translation dialogs, and feedback. Here's how it works everywhere:
Recording Audio:
- Click the Microphone Icon button
- Your browser may ask for microphone permission - click "Allow"
- You'll see:
- A timer counting elapsed time
- A waveform visualization (moving bars showing audio levels)
- This confirms your microphone is picking up sound
- Speak clearly into your microphone
- Click the Square Stop Icon button when done
After Recording:
- Play button (triangle): Listen to your recording
- Progress slider: Scrub through the audio
- Time display: Shows current position / total duration
- Discard button (trash icon): Delete and re-record
- Use/Confirm button: Accept this recording
Uploading a Pre-Recorded File:
- Click "Upload" instead of Record
- Select an audio file (MP3, WAV, WebM, etc.)
- File must be under 10MB
- Audio loads into the player for preview
- Click Use/Confirm to accept
Playback Controls:
- Play/Pause toggle
- Progress bar (click or drag to seek)
- Time display (MM:SS / MM:SS)
Preview Mode
Every question type has a live preview panel to show what students will see.
How to Use:
- Edit the question on the left side of the editor.
- Review the student-style preview on the right.
- Check prompt formatting, linked translations, answer options, blanks, word order, or recording instructions.
- Use the preview to catch missing context before saving or publishing.
Saving Your Work
How Saving Works:
The question editor uses an explicit save approach:
- Make your changes in the editor
- Click the "Save Changes" button (in the footer/toolbar)
- The system:
- Checks whether the question is complete enough to save
- If something is missing: Shows messages at the bottom
- If everything is ready: Saves the update
- Success: Green notification "Question saved successfully" → Navigates back to lesson
- Error: Red notification with error details → Stay on editor to fix
Unsaved Changes Protection:
If you try to navigate away with unsaved changes:
- A confirmation dialog appears: "You have unsaved changes. Are you sure you want to leave?"
- Stay: Return to editor
- Leave: Discard changes and navigate away
Publishing Questions
Questions have a Published status that controls student visibility.
Draft vs Published:
| Status | Students See It? | Instructor Can Edit? |
|---|---|---|
| Draft | No (hidden from students) | Yes |
| Published | Yes (if unit AND lesson are also published) | Yes |
Publishing a Single Question:
- In the question editor, find the "Published" toggle/checkbox
- Check it
- Save the question
- The app checks that the question is complete before publishing
Bulk Publishing:
From the Lesson Detail page, select the lesson status chip to open the lesson bulk publish window. From there you can:
- Publish or unpublish the lesson itself.
- Select complete draft questions to publish.
- Deselect published questions to unpublish them.
- Publish or unpublish information entries in the same lesson.
- Apply all changes together.
See Bulk Publishing for the lesson-level and unit-level flows.
What Must Be Complete Before Publishing:
The app will not let you publish a question that is missing required parts. Each type has specific requirements:
| Question Type | Must Have |
|---|---|
| Multiple Choice | All 4 options complete, correct answer selected, translations linked when required |
| Fill-in-Blanks | Blanks exist, all assigned, words translated when required |
| Build Sentence | Solution not empty, word-bank items translated when required |
| Type Answer | Answer text not empty, prompt complete |
| Record Audio | Prompt not empty |
Content List Management
Viewing Content in a Lesson:
The Content List in Lesson Detail shows all content entries (both questions and information entries) in sequence order:
| Column | Content |
|---|---|
| # | Content number (order) |
| Type | Content type - Question type (Multiple Choice, FIB, etc.) or "Information" |
| Preview | First 80 characters of the prompt or information text |
| Status | "Published" (green) or "Draft" (blue) chip |
Actions:
- Click a row: Navigate to the question editor or information editor
- Delete: Soft-delete an entry (data preserved, hidden from active lesson flow)
- Restore: Restore a deleted entry
- Show Deleted toggle: View previously deleted entries
Searching:
- Use the search input to filter by question type or prompt text
- Results update as you type
Pagination:
- Default: 10 questions per page
- Options: 10, 25, 50, 100 per page
- Navigate pages with pagination controls
Common Workflows
Workflow 1: Create a Vocabulary Quiz (Multiple Choice)
- Prep: Add vocabulary words to Translations dictionary with audio
- Create: Add Question → Multiple Choice
- Prompt: "What is 'dog' in Ojibwe?"
- Options: Animosh (correct), Gookoosh, Makwa, Migizi
- Translations: Click each option, select from dictionary (auto-links audio!)
- Correct: Click radio button on "Animosh"
- Image: Insert a picture of a dog in the prompt or instructions
- Preview: Check the live preview
- Save & Publish: Save, then publish
Workflow 2: Create a Sentence Exercise (Fill-in-Blanks)
- Prompt: "Complete the sentence"
- Sentence: Add words "Niin" "zaagi'aa" "animosh" one by one
- Blank: Click "Mark as Blank" on "zaagi'aa" (it moves to word bank)
- Extra words: Add "wiidookaw" to word bank as a distractor
- Assign: In Blank 1 dropdown, select "zaagi'aa"
- Translations: Link translations for every word (sentence + word bank)
- Preview: Test the drag-and-drop
- Save & Publish
Workflow 3: Create a Word Order Exercise (Build Sentence)
- Prompt: "Put these words in the correct order"
- Word Bank: Add "Niin", "zaagi'aa", "giin", "makwa" (distractor), "wiidookaw" (distractor)
- Solution: Drag "Niin" → "zaagi'aa" → "giin" into the target area
- Difficulty: "Medium" (2 extra words out of 5)
- Translations: Ensure every word has a translation
- Preview: Test the word ordering
- Save & Publish
Workflow 4: Create a Pronunciation Exercise (Record Audio)
- Prompt: "Aaniin" (the word to pronounce)
- Image: Insert a cultural context image in the prompt or instructions (optional)
- Save & Publish
- Later: Review student recordings and provide audio feedback
Workflow 5: Create a Recall Exercise (Type Answer)
- Prompt: "How do you say 'hello' in Ojibwe?"
- Answer: "aaniin" (case-insensitive)
- Preview: Type "aaniin" to verify it's accepted
- Save & Publish
Tips & Best Practices
Content Design:
- Mix question types within a lesson (keep students engaged)
- Start easy, get harder: Simple recall → sentence building → pronunciation
- Include images whenever possible (visual learners benefit greatly)
- Keep prompts clear: Short, unambiguous instructions work best
- Test every question in preview mode before publishing
Translation Efficiency:
- Build dictionary first: Add words to Translations before building questions
- Use translation suggestions: Word-bank inputs suggest matching translations as you type
- "Update All" when prompted: Sync translations across the question instantly
- Community translations: Check community translations before creating duplicates
- Record audio in translations: When audio is on a translation, it automatically appears on questions using that translation
Common Pitfalls:
- Forgetting translations: Missing-translation warnings mean required links still need attention
- Wrong correct answer: Always double-check which Multiple Choice option is marked correct
- Fill-in-Blanks with no assignment: Each blank MUST have a word assigned from the bank
- Build Sentence with no distractors: Add extra words for challenge (otherwise it's too easy)
- Type Answer too long: Long expected answers increase typo risk for students
Accessibility:
- Add images with context: Helps visual learners
- Record clear audio: Pronunciation models should be clear and at natural speed
- Use consistent formatting: Keep prompts consistent across questions in a lesson
Troubleshooting
"Cannot save: validation errors"
- Read the error messages at the bottom of the editor
- Common causes:
- Missing translations in prompts, answers, sentence text, or word banks
- No correct answer selected (Multiple Choice)
- Empty blanks not assigned (Fill-in-Blanks)
- Empty expected answer (Type Answer)
"Translation not found" when adding words or selected text
- The word may not exist in your dictionary yet
- Open the translation control for the word or selected text, then choose Add New
- Or go to Translations first and add it
Missing translation warnings
- The text or word is missing a required translation
- Open its translation control
- Select an existing translation, create a new one, or mark it as N/A if the word does not need translation
Preview shows wrong behavior
- Check correct answer selection (Multiple Choice)
- Verify blank assignments (Fill-in-Blanks)
- Check word order in target solution (Build Sentence)
- Verify expected answer text (Type Answer)
"Unsaved changes" dialog keeps appearing
- You have changes that haven't been saved
- Click "Save Changes" to persist your work
- Or click "Leave" if you want to discard changes
Question not visible to students
- Check Published status for the question or information entry
- Check that the lesson is published
- Check that the unit is published
- Check the Available Date
- All of these must be ready before students can see the content
Summary: Question Type Decision Guide
| I Want Students To... | Use This Type |
|---|---|
| Pick one correct word from fixed options | Multiple Choice |
| Fill in missing words in a sentence | Fill in the Blanks |
| Arrange jumbled words into a sentence | Build Sentence |
| Type a word from memory | Type Answer |
| Practice saying a word out loud | Record Audio |
Each type tests different skills. Use a mix of types within each lesson for the best learning experience. Start with Multiple Choice (recognition), progress to Type Answer (recall), and finish with Record Audio (production) for a natural learning progression!